Monday, July 4, 2011

From Buttons To Bows Blog Challenge

Happy 4th of July! The sun is shining here and we have beautiful breeze blowing through our windows. Gotta love summertime in Northern Michigan! I can hear the tractor going around the field, baling hay...another summertime/4th of July tradition in our family. I thought I would share one of my favorite 4th of July scrapbook pages with you. I used Stardust L2 (retired) paper, Picture Perfect and In The Month Of July stamp sets. I found the cute bear and stars on eBay a few years back.


Today, I have been busy working on some Christmas cards for an upcoming swap that I signed up for. I will share pictures with you later this week.

For now, I am going to upload a few layouts where I used bows. A fellow Close To My Heart Consultant has a weekly stamping challenge, and I thought it would be fun to share some of my oldies but goodies with you today.
Twitterpated Layout
Mistletoe Layout
Wings Layout
 Sophia Layout

Thank you again, Diana, for creating another fun stamping challenge!

Have a wonderful evening, and safe travels to everyone!

Casandra

Sunday, July 3, 2011

Prepping for a Workshop

Good morning! Hope you're having a fabulous weekend. The sun is shining here for the second day in a row. Love it!

For those of you who may be curious, I thought I would share a little tour, behind the scenes, of what goes into preparing for my workshops.

First of all, it's good to have an idea of what theme you are going to work with. I find it easiest to build your workshop around certain holidays coming up. This works for both scrapbook and card workshops.

If you find that you are in a particular month that really doesn't have any special holidays coming up, it's good to get feedback from your workshop attendee's. I asked my customers what they wanted to see. From there, we decided to create 4 sympathy, 4 thinking of you and 4 birthday cards.

I felt it was important to create cards with a generic enough look, that most of them could double as something else just by changing out a sentiment, either on the inside or the front of the card.

So, after all that, it was time to get busy creating. This is my favorite part. I decided that I would spend one weekend just creating so I could get pictures of most of my cards at one time. After I had 10 of the 12 cards completed, I created an event on Facebook for my friends and family to see. I listed out all of the details for them, and left contact information in case they had any questions.

I love how these cards turned out. If you find yourself at a loss for inspiration, Close To My Heart's idea books are a great place to start. I also like to look through a current Card Creations magazine. If all else fails, I look at a fun stamp set, and visualize a "scene". This is especially true for my Mayberry "Bird" card, and the Mayberry "Life is Good" card.

After the initial design phase, I begin making pre-cuts for my guests. I make enough for a certain number of guests, in this case, 11 more. This way, I can have at least 2 examples out on the table for them to see. This, incidentally, was a decision I made after my first card workshop.

I then move on to paper piercing edges so I can hand-sew on the papers. Once that is finished, I thread any buttons that will be used on a particular card. (Buttons can be applied at the workshop with glue dots.) I follow up with ink distressing the edges. This is particularly helpful if you have limited sponges to go around.


After that, I begin bagging up all papers, envelopes, embellishments, and stamps by card. Here, you can see how this comes together.
After all of the cards are bagged up, I will then write out a supply list, including ink colors and card recipe, and include in each bag. This will help me pull it all together on the day of the workshop. Baggies are placed in a box with enough room to prevent crushing.

On the day of the workshop, I will have time to finish last minute preparations of setting up tables and chairs, baking, and setting out measurement placemats for each guest to use for generational stamping and assembling their cards.

So, I hope you have enjoyed my little behind-the-scenes tour of what goes into my workshops. Organization is the key. Knowing how many guests you will have in attendance, as well as knowing what theme you are going to use, helps pull it all together.

Have a wonderful day!

Casandra

Saturday, July 2, 2011

Birthday Blast Miracle Card

Today, I was beginning to think it would be a miracle to get my prep. done in time for the card workshop (next weekend). Phew! Worry, no more. I am finished!

Here is the card that I just completed a few minutes ago:

This card has a few techniques to show off. I used the edge distresser to "wrinkle" up the edges. Stamping, coloring, and paper-piecing round out the extra techniques.

Now, here's a secret to share with you. I didn't like this stamp set when I first saw it. I thought it was too cartoonish. But, the more I looked at it, the more possibilities I saw from this set. And the sentiments? Could they be any cuter?! :)

Here is a list of products used to make this card:

Birthday Blast Stamp Set
Cranberry, Crystal Blue and Desert Sand Inks
Watercolor Pencils (Honey and Desert Sand)
Desert Sand, Creme Brulee, Cranberry and Colonial White Cardstock
Miracle Level 2 Paper
Colonial White Grosgrain Ribbon
Cranberry Brads
Edge Distresser
Wishes How-To-Program

If you click on the picture, you will be able to see it in larger detail. From there, you will see how I used the Desert Sand watercolor pencil to outline some of the images. I have yet to emboss, so I'm guessing this set would be super cute with embossing.

I can't wait to show my workshop guests how to create this fun birthday card. As of yesterday, I have 8 people signed up. I still have room for 2 more guests, if you are interested. Please contact me by Saturday, July 9th to RSVP.

Hope you're all enjoying your holiday weekend!

Casandra

Thursday, June 30, 2011

Studio J Free-For-All Layout

In case you haven't noticed, I am lovin' the Mayberry paper pack. The colors are so bright and cheerful and can be used for Spring, Summer, Autumn, and I bet if I tried, I could even find a way to use them for Winter!

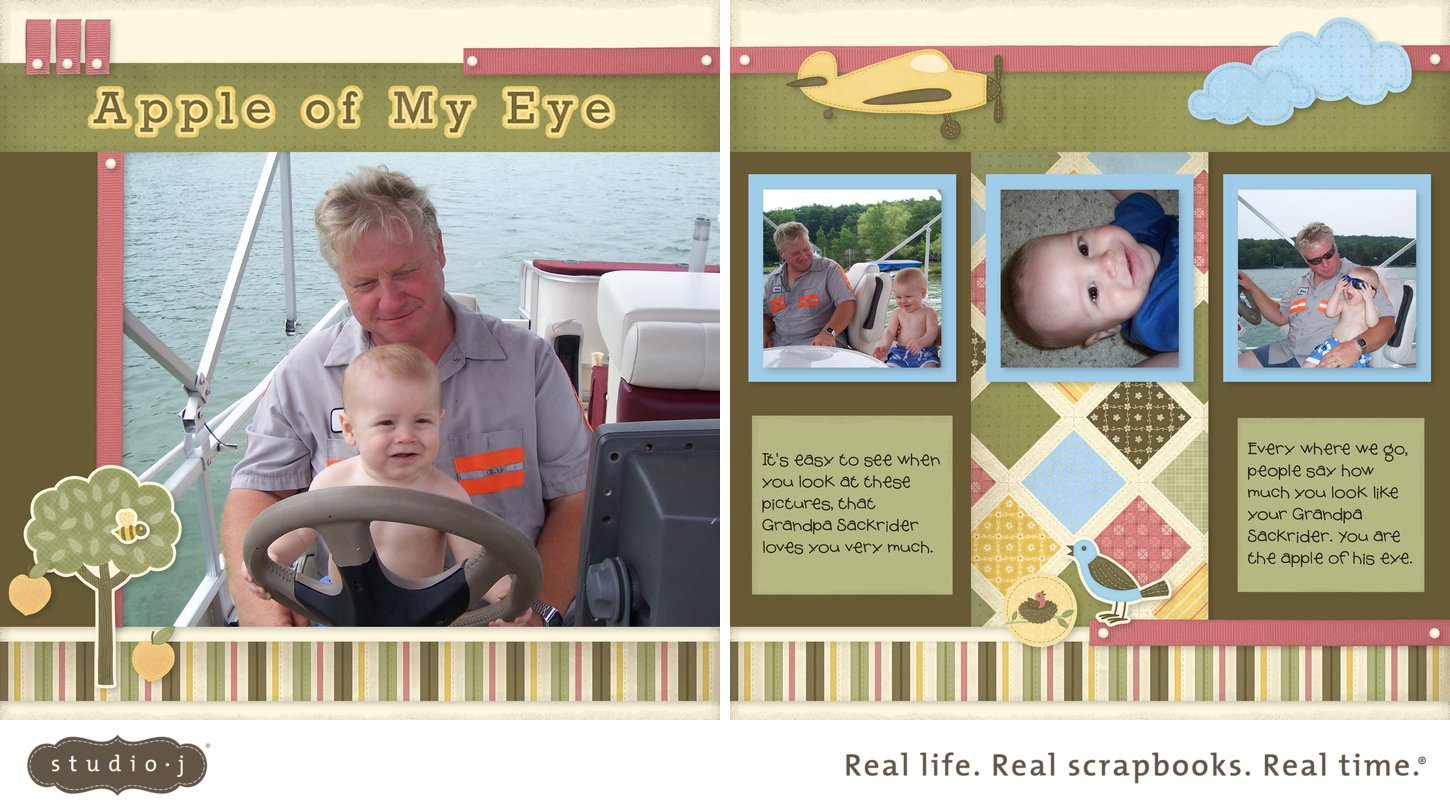
Since today is the last day that we can get a free jpg download from Studio J, I decided it was time that I went on-line and scrapped. I still prefer traditional scrapbooking, but I love that I was able to create a digital layout in about 35 minutes. That's about a 1/3 of the time it takes me to make a traditional layout.

Since it is Father's Day month, I thought I would honor my father and my son in this layout.


Jack is truly the apple of his Grandpa's eye. Like my journaling says, everyone always says how much Jack looks like his Grandpa. I probably should've changed the title to say Apple of Your Grandpa's Eye, but oh well. I love it. I know my family will, too.

If you haven't yet logged on to Studio J, please visit my website, and follow the link for Studio J.

Just a quick note, if you are not a current member of Studio J, you will only be able to use the templates that do not have *Members Only* stamped across them. This template is called Powerful Trio.

If you have any questions about Studio J, please don't hesitate to contact me via e-mail. You have until 11:59 pm EST to get your layout completed, approved and purchased (free, of course).

Have a wonderful day!

Casandra

Wednesday, June 29, 2011

Shhh....

Shhh.... I have just been a very naughty girl today.

I went to Jo-Ann's, when really I should know better and just stay out of that store, right? Well, they had a 4-pack of Spellbinder dies (Scalloped & Classic Ovals - Small and Large) for $39.99. It's been there for ages, because it was special ordered for someone who must have had a change of heart, like yeah, I know...I should've, too. Zoikes.

Anyways, after I had to print out an oval shape, enlarge it on the copy machine, cut both ovals out, and then trace around them so I could make that giraffe card the other night, you can see where I'm going with this.... LOL I just had to have it.

I have a Cuttlebug. Can anyone tell me if I need a special mat to cut with the Spellbinder's (in addition to my Cuttlebug plates)?

I will have to use them to create my Christmas cards that I will be making this weekend for a card swap. I'm feeling a little giddy right now just thinking about all the fun I will have with them. Hopefully, the guilt will go away soon. :)

Any advice on how to use the Spellbinder dies would be greatly appreciated. Have a blessed day!

Casandra

Tuesday, June 28, 2011

Stardust Laugh Layout

Back in January, I was feeling the mid-winter blue's and decided to make a layout featured in the Magic How-To-Program. In fact, it is nearly identical to the layout shown in the book. It was a bit intimidating, at first, but I quickly got the hang of it. It was actually easier than I expected, and it has such a pop to it, that it will stand out in Jack's album for years to come. I'm super pleased with it.


  • Stardust Level 2 Kit (Retired)
  • DCWV Orange Cardstock (sponge stamped with Autumn Terracotta Ink to darken)
  • DCWV Navy Blue Cardstock
  • Chocolate Twill Ribbon (Clearance)
  • Sunset, Lagoon & Outdoor Denim Buttons
  • Antique Copper Bitty Brads
  • Field Trip Stamp Set
  • Magic How-To-Program: Hocus Pocus Template

I am uploading this to my blog today to participate in a brand new blog challenge that a fellow CTMH consultant has started. You can check it out here. Thanks, Diana!
The chocolate ribbon used in this layout is currently listed in the "Shop Online-While Supplies Last" section of my website.
Can't believe how big my kids are getting. These pictures are from January, 2009. :)
Have a wonderful day!
Casandra

Monday, June 27, 2011

Mojo Monday 196 Meets PBK

I found inspiration for this card from two very different places.

First of all, I was flipping through a current Pottery Barn Kids catalog last week. The colors on Page 66 reminded me of my teenage bedroom decor. The bedroom walls were white, and the curtains and bedding were lilac and white floral with eyelet lace trim. A friend from England gave the set to me. One of those things that I didn't realize that I left behind when I moved out of my childhood home....


When I saw last week's sketch for Mojo Monday here, my vision was born.


Here is my take on the two "sketches" merged together.


Here is a list of supplies used:

  • It's A Zoo Stamp Set
  • For Every Occasion Stamp Set
  • Pearl Opaques
  • Creme Brulee Ribbon
  • Purple, Sweet Leaf and White Daisy Cardstock
  • Creme Brulee, Chocolate, Sweet Leaf & Smokey Plum Inks
  • Stampin' Up Scallop Border Punch
  • Cuttlebug Embossing Folder
This was a lot of fun for me, and a new way of creating cards. Sometimes, we need to think outside of the box. Hope that I have been able to inspire you.

Happy crafting!

Casandra